Hello everyone! Wow... welcome to December huh?! I know I haven't posted this month yet... and by the looks of it, this will probably be the only one before Christmas.
Since this will be the only post I'm cramming in as much crafting as I can.
So please, bear with me and keep on reading and scrolling down ;-) for all of the fun things I've been wanting to show you!
Well, in the words of my loving mother - O M Goodness!
FELT GLOBE KIT

The new, anxiously awaited pictures of the felt globe are finally here!!

It was by far the most fun I've had working with felt. The whole thing took me about a week and a half. I basically locked myself up in my crafting room... ended up listening to 4 books on tape (they are a life saver truly - and if you have time anything by Suzanne Collins is AWESOME!)
Ok, back to the Felt Globe *hehe*
The Globe was brought to my attention by a friend who saw it on Design Mom's Blog. Being very taken by this globe I jumped at the chance to make a pattern for it. I came to the conclusion that making the globe and selling it would not be very price effective... simply because the small icons are pretty detailed, so I decided to make a pattern and a kit for it - So that you would be able to make this fantastical globe yourself!
Just imagine yourself this winter crafting away at such a fun project!!!
The globe hangs on the wall. The continents are attached, but the icons have Velcro on the back of them so that your children can have fun putting them in their correct places.
What an awesome way to teach your little ones where the Statue of Liberty, Eiffel Tower, or the Golden Gate Bridge is?!?


Additional coolness factors are:
(1) A world traveled suitcase that you can store all the neat icons in....
& (2) Three 3D Airplanes - the largest of which your children can "fly" to destinations! And, it's equipped with it's very own airplane hanger!
Here's what your kit will look like:
There are over 45 pages of detailed instructions too...
It sounds like a lot, but I wanted to make the directions as easy to follow as possible, so even if you aren't the most crafty of people you could totally make one.
[Here's a tip I found when making my own - If you lay the paper pattern over the felt and then cut through both of them you'll have way more control with the scissors.]

I thought I'd let you peek into my workspace... or as my husband called it... my mine field!
This picture kind of looks like one of those "I Spy" books ;-)

Can anyone spot the fingernail polish remover, my bag of chips and a soda can!!!
MEMORY GAME - NATURAL STYLE

The other day I was looking on Etsy, and found these memory games for kids, made by Lemon Tree Studios. And, for only $16 they really are fun! But since I'm making and not buying things for L'bug this year I had to improvise.
By improvise I mean Der was sent outside with a tree trimming saw to retrieve a suitable branch from our back yard! Then I cut the branch into 1/8" wide disks.
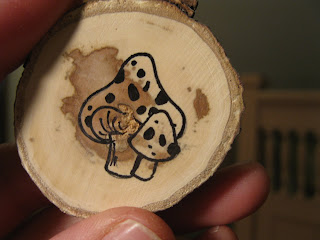
I found some icons online and used tracing paper to make two exactly the same, then went over the design with a fine tip permanent marker. I ended up making 8 different pairs of wooden disks.


The rockin cool bag was from some vintage Peter Rabbit fabric given to me by a wonderful lady that I'm recovering some chairs for. Can you believe that they originally were curtains for her son's room over 30 years ago!!!
SLEEPY MASKS
I have three things, ok four things that are very crucial for me to have to go to sleep. One, my phone. Two, my hot water bottle (a winter thing only.) Three, my iPod.
(I have a playlist solely dedicated to thunderstorm/rain sounds.)
And forth, my sleeping mask.
The idea came from last year's Anthropologie winter catalog. On the cover were girls showing off some really cute eye masks. Of course really cute for them, would've cost you around $30 a pair. My mom's best friend had given me a box full of vintage ties - and so I used the ties for the outer material, and new silk for the part that goes against your face.

I also used the tags from some of the ties for a fun detail.

Another detail was some simple blanket stitches and an closed eye ;-)
One is a gift - but Santa doesn't tell for whom...

COFFEE CUFF
One Sunday morning I saw a girl with some coffee - not unusual right?
(Our church pampers us by serving coffee, doughnuts, and other goodies on Sunday mornings. And the best part... we get to take them into the service!)
Ok, so the girl's coffee - around which was a super cute coffee cuff! I asked her where she got it and she said that a friend of hers sold them at her coffee shop.
They were made out of reused sweat-shirts and plastic grocery bags! The idea from then on was stuck in my head and I had to have one.
I know Starbucks has some made of felt, but come on people... Have you seen them?! They're solid gray :( and totally Debbie Downer sad looking! As you can guess I made my own. I used an existing sleeve for the pattern, and I've got to tell ya - it was so much fun yo!
I've made a couple - some are gifts but I'm not going to tell for whom...
*wink*
They are made with random left over pieces of felt and fabric.
OWL ORNAMENT
Almost all of my ideas come from things that I've seen while online or looking at books or magazine. The hardest thing for someone who sews is the urge to say, "I'm not going to buy that because I know I can make it." That can be a good thing, but also a bad thing...
A good thing, because you can be resourceful and save some cash - a bad thing when that list of things you're going to eventually make gets too long to accomplish. When really, buying that $6 ornament and getting to see it hanging beautifully on your tree is a way better idea than not having one at all.
Ok - let me get down off my randomness crafting soap box! lol
If you do by chance think like I do and refuse to buy things that you know you could very well make - take heart! Why?
Because you can totally make this freaking cute owl ornament in no time flat!
I saw them (3 for $24) in the Crate & Barrel mailer and made up a quick pattern for them.
All you need is some scrap fabric, a few scrap pieces of felt, a little bit of stuffing, a couple of colors of embroidery floss, two buttons, and some ribbon or string.
First cut out the owl body, wings, and feet pieces. I don't have a picture of it, but lay the wings and feet on the inside of the two fabric body pieces - so that when you sew the body together and flip it inside out the wings and feet will stick out.
Make sure you leave part of the top open to stuff it.
Once you've stuffed the owl, sew shut the top opening. Then cut out the body felt details.
Blanket stitch the top piece (the one between the eyes) and I made small "X" stitches to secure the side body pieces.
Hot glue the ribbon or string under the center top felt piece. I put a drop of glue on the string and then used a tooth pick to push it under the felt to hide the glue.
Cut out the large eye pieces and blanket stitch them to the body.
The below picture shows where I hid my embroidery knots - inbetween the two wing pieces!
Blanket stitch the smaller piece circles onto the larger eye circles.
Attach buttons to the center of the eyes. I didn't make a pattern piece for it - but cut out a small triangle for the beak piece and make a few stitches to secure it to the body.
I made my stitches into a sort of arrow shape, but you can feel free to do whatever you think looks best.
Blanket stitch around the wings
Whip stitch around the feet. And then PRESTO! You've got yourself a really cute gift either for yourself or a loved one.
Here's the pattern - just right click and save it to your desktop, then print it out. You could even take it to a print shop and have it enlarged to make a pillow...
Make sure you cut 4 of the wing and feet pieces ;-)

I hope you've enjoyed my blog this year. I've had such a blast posting and sharing with you all of the fun things that I've been making.
If you see anything that you'd like to purchase please contact me at:
for prices and details.
Thank you all so very very much!
Merry Christmas to all and to all a good craft!

 There's a mama and a baby rabbit. She said they were really fun and quick to make. And the fabric on the ears was such a cute touch.
 There's a mama and a baby rabbit. She said they were really fun and quick to make. And the fabric on the ears was such a cute touch.
 I love the smiling faces!
 Here they painted a picture frame purchased from a thrift shop. The glass had a small crack in the lower left hand corner - so they cut out flowers from printed fabric and then glued them onto the glass - a very clever way to fix the glass and make the frame one of a kind!


 My craft room mess is actually an oasis of peace for me... as crazy as it seems.


